Tuesday, May 29, 2012

Yummy Cinnaburst Bread

I was on pinterest looking at all of the yummy food recipes and came across one of my favorite breads of all time- Cinnaburst bread from Great Harvest. This bread brings back so many great memories! Seriously, this bread recipe has to be the best copycat I have ever tasted. I wanted to share the recipe courtesy of raegunwear blog.

Great Harvest Cinnaburst Copycat Bread


1 cup warm water
1 cup warm milk 
1/3 cup sugar
2 1/4 teaspoon yeast (1 pack)
1/3 cup oil (I used veggie oil)
1/2 T salt
1 egg
4 1/2 to 5 1/2 cups all purpose flour
1 cup cinnamon chips
  • In mixer combine yeast, sugar, and warm water and milk; let bubble for about 5 minutes. 
  • Add in oil and egg. 
  • Slowly add 2 cups flour, mix and then add salt. 
  • Add 1/2 cup flour at a time until it comes away from side of bowl. Add the cinnamon chips when it gets close to the right consistency. The dough will be very sticky but the softer the dough the lighter the bread. So use the least amount of flour you can handle. 
  • Let rise in mixing bowl for about 30 minutes. 
  • Form into loaf (or whatever shape you want).
  • Let rise and additional 30 minutes. 
  • Bake at 350 degrees for 30-45 minutes. 
 Makes 2 loaves
-------------------
You may have noticed the recipe calls for Cinnamon chips. I found a recipe also on pinterest of how to make your own cinnamon chips. This will save ya a lot of money because from what I have read they are sold at lots of whole food markets and are pricey. 


Ingredients: 
  • 2/3 cup granulated sugar
  • 3 tablespoons ground cinnamon
  • 2 tablespoons vegetable shortening
  • 2 tablespoons light corn syrup
  • ¼ teaspoon vanilla extract
Directions:

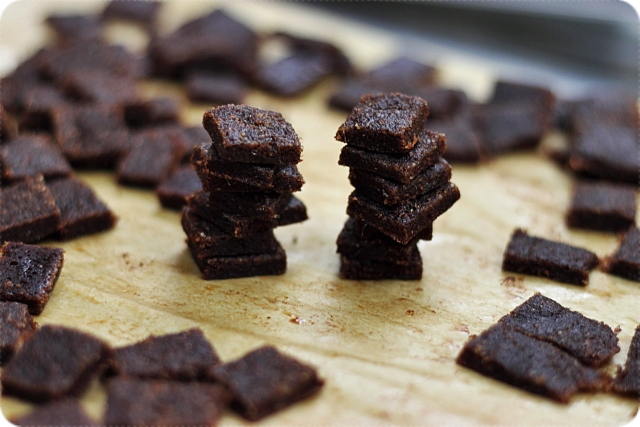
  1. Preheat oven to 200F. Place a sheet of parchment paper on a cookie sheet and spray liberally with cooking spray. Set aside.
  2. In a medium size bowl, combine the granulated sugar, ground cinnamon, shortening, light corn syrup and vanilla extract. Mix with fork until the mixture is uniform and crumbly. Spread on parchment lined baking sheet, flattening with your hands and shaping into a rough square about 1/4 inch or so thick. Bake until mixture is melted and somewhat bubbly, about 35 minutes.
  3. Cool completely, and then cut into small pieces.
  4. Makes approximately 2 cups


Here are some pictures of how the bread turned out...


So delish! 

Photobucket

DIY: Summer Topiary

I wanted to share one of my favorite projects I have been working on this month. My family room was in need of something fresh and summery. About a year ago, I found this lovely topiary at the thrift store for a buck. It was in need of some help badly. It was a pretty simple project and one I thoroughly enjoyed. Here are the instructions if you would like to make one too!


Supplies Needed: 
1) Old Topiary needing some help {Find at thrift store or use an old on}
2) Bright flowers {Preferably smaller sized ones. I used the flowers off of two geraniums {Joanns $3}
3) Hot glue gun 
4) Sewing Pins/Push Pins


Find an old topiary. You can use this same concept doing a new one {with the foam spheres you can get at Joann's} Here is my old beauty. I love the urn it is in. 

Step 2: Pull off all of the old flowers, leaves ,etc until it is bare. 
Step 3: Pull the new blossoms off of your silk flower stems. I unfortunately didn't get a picture of this step {sorry!}. 
Step 4: Use the pins to make small holes for the ends of the flowers to fit in on the topiary. 
Step 5: Use a dab of hot glue to place the flower where the hole has been placed. 
Step 6: Continue steps 4 & 5 until you have reached around the whole topiary. 
Step 7: Enjoy your new creation.  
 {PS: I am going to spray paint the urn white to make it stand out more.} 


If you end up making one, please forward a picture on! I would love to see your creations too! :) 


Photobucket

Thursday, January 12, 2012

Few of my favorite things

Here are some of my favorite go to's lately. They have saved time and inspired me. The last one is just exciting! Let the countdown begin :)

1) Have you seen this cool website for creative hairstyles? I love it and refer to it often. They have so many different tutorials for long to short hair for little girls and moms too! I like to try one out each week on my darling model! :)


2) I have been introduced to Pinterest and LOVE IT! So many talented people with creative ideas. I love how it can help you organize fun ideas you have found either through pinterest or blogging...

3) I am really loving going to the Public Library especially with my sidekick! She loves reading the American girl dolls series {blast from the past}! 


4) Found these at the grocery store a few months ago. They are delish! 
5) Can't wait for this movie to come out...Hunger Games in March! 


What are some of your favorite things? I would love to hear! :) 
Photobucket

Tuesday, October 25, 2011

Making the Flute Cool

Last night, Mr. G and I were talking about instruments and how much we love them. For our family night, we decided to look at all of the instruments through You tube of course. {Wow- there are tons of talented people!} It was a really fun night to expose Little Miss E to all of the neat instruments out there {yes even the Tuba! Can you believe my band teacher wanted me to play the tuba when I was in 6th grade? I have no idea how I would have carried it. All I know is it would have been a funnier scene of a short girl carrying an instrument as a big as her compared to my violin case?! haha} We let her pick her favorite. It was a tie between the flute and the violin.

Anyway, I had to share this movie. I will let it speak for itself.
Awesome huh?
{Totally great- he is inspiring kids everywhere!}

Photobucket

Wednesday, October 12, 2011

DIY Fall Garland

I am so excited to tell you about this project! Super easy, cute and inexpensive!!


I had been wanting to make some kind of garland to hang up in our house. Unfortunately, we don't have a fireplace, but I think this added the perfect touch to our Halloween/Fall decor!

While I was working on a transformation from skirt to dress DIY project {out with the machine and all} I decided this would be the easiest process to make the garland. 

Supplies needed:

  • All a Dollar bag of leaves {$1}
  • Thread
  • Super Mad Sewing Skills! You could do this by hand... :) {PS:If you do, You're my hero!!}


1) Whip out your sewing machine or if you are working on another sewing project, this will be simple and quick!
2) Just feed your leaves through
3) Make sure you adjust the length you want between them if you want it to be exact. I didn't and I think it adds more personality!!

Happy Sewing!!

What fall projects are you working on?

Photobucket

Thursday, September 15, 2011

Pulling out the Colored Jeans

Do you remember these back in the 90's? {I think that is when it was...I remember them in Elementary school...} They are really cute and I would love to own a pair. But remember the challenge I was sticking to? Yeah, so I was thinking I wonder if you could use some good ole RIT dye to try and be able to use this fall fashion.

Well today I found this awesome tutorial on how to dye your own colored jeans...http://laviepetite.blogspot.com/2011/09/how-to-dye-your-own-pants.html. I love her blog because she helps those of us that are shorter/petite dress better ;)

Apparently, I am not the only one with this idea... here is another darling tutorial of a before and after. Want to make them with me?? Didn't she do such a good job and she even used a pair of "normal" jeans... http://www.lazy-saturdays.com/2011/09/four-ways-to-wear-colored-jeans.html


Also, saw this yesterday online too... http://studio5.ksl.com/index.php?nid=58&sid=17239170. Laci shows the different ways to pull off this look and has some ways to dress them up or down.

Be watching for a tutorial on some of these colored jeans in the next couple of weeks... :)

At first I didn't know what to think about this look because I am short but have really long legs and was worried it might make me look silly I guess. I am going to give it a try and you will have to let me know what you think about them, promise?

I am really loving the red colored jeans... The only problem is red is one of the hardest colors to get dye wise...  Here's hoping {keep your fingers crossed that I can find the perfect shade of red!!}

{PS: Have you checked out Anthropologie's latest arrivals? Cords are back in- what? I am loving fashion more and more because everything seems to be in... ;) }

Monday, September 12, 2011

I love Dyeing!

So here is the backstory... See these awesome shorts, well they kinda have a problem. My daughter has her daily vitamin, and for some reason I had put it in my pocket because it was an on-the-go type of day. Well these sweet and one of my favorite pairs of shorts, got put in the wash. Did you know vitamins stain? Even the little kid ones? Well here is the result... Sad huh?

Before picture:


While in college, I took this awesome class on text and textiles. I learned a lot and dyed a ton of fabric {Did you like my title of this post? Haha- there's a joke for the day} The dyes we used in that class were a little out of my own budget, so I simply got a dark chocolate RIT dye from Walmart for around $2. I haven't done any dyeing projects and I was so stoked to be able to work with dyes again!! :)


So I will give ya a run down of the process I did...{PS: If you are interested in getting high quality dyes, refer to this company http://www.dharmatrading.com/ . These are the ones our professor loved and I learned to adore!}


Supply List:
-Gloves
-RIT dye {I chose dark chocolate because it seemed like it would be in the family and not show the stain}
-Bucket or old sink {Bucket is all I have...}
-Hot, Hot Boiling water {3 gallons}
-Pots to heat water in
-Something to stir with {I used an old spoon that had almost seen its days from when we first got married}
-Plastic/Garbage Bags {Help with the mess part}
-Salt {3 cups}
-Laundry Detergent {1 TBSP}
-A place to rinse your fabric


Here are the supplies....


Step 1:- Find a place where you will be able to do your work. Get all of the supplies. *If you have kids, try and do this while they are taking a nap or are busy doing something, because they will be really curious... :) {I may have had a girl that was curious haha}* Lay down garbage sacks or something you have on hand in case the dye spills so it won't ruin anything you love {tile, clothes, carpet, etc}

Step 2:- Start heating up your 3 gallons of water. {I used every pot I had on hand to get the 3 gallons. It was a humorous site :)}

Step 3: Pour your hot water in the bucket or sink or wherever your workplace may be. **Don't burn yourself. I would feel badly if anyone burned themselves...**


Step 4: Pour in your laundry detergent, salt and dye. The bottle said to use half of it but then I remembered from my class if you want it to be darker, use more dye...So I used the whole bottle! {It started looking like it was going to be a purpley brown, but this can be deceiving. If it looks like it is dark, beware, because it may be lighter after it gets washed. Keep in mind to be a little generous...}

Step 5: Stir the mixture with your spoon/stirring device!

Step 6: Add in your fabric you are wishing to dye. I have learned a lot with dyeing different fabrics. Cotton is normally the best. I have dyed lace, cotton blends, cheese cloth, polyester blends, and flannel. Flannel was really interesting and the lace I used for headbands later. Have fun experimenting!!

Step 7: Stir, Stir, Stir. Stir, Stir, Stir. {PS: A girl in my class had the neatest designs using elastic bands, etc. If you want a tie dye look or textured, use bands, rope, clips, etc. Do this before you put the fabric in the dye. Have fun and go to town!}

Step 8: After half an hour, take the bucket and pour it into a sink or somewhere you can rinse it off. Keep rinsing until there is no dye left and the water is clear. This process took me a lot longer than it did in college- probably because I used a ton of dye... :) \

**Sorry I forgot to get a picture of this step... But it is pretty easy to understand! :) **

Step 9: Throw it in the washing machine. Warm water and add detergent. This can be the only thing in the washing machine otherwise you will have an unpleasant surprise with your clothes different colors :)

Step 10: The best part of all...waiting and seeing what creation you have just made. You can either hang it dry or dry it in the dryer. Beware the first few times washing your fabric because it can still bleed onto other fabrics. Wash it by itself the first three times you use it. ENJOY!

AFTER: Here is the final product. Love the color, but the thread didn't dye or hold in any color. I was a little disappointed about that. But dyeing is a process of testing and seeing what works...But I am excited to wear these again! 
Do you think these two pictures look at all similar? The first one is my dyed shorts the second is my handsome hubby's swimsuit... HAHA! 


What do you think about my shorts?  Do you have any stories about your dyeing adventure? :) 

I would love hear your experiences with dyes!!